Showing posts with label Felt. Show all posts

May 20, 2014

Daisies and Summer..!!

Now its time for summer, I see daisies all around. Then why not to have fun making couple of them with felt cloth..!!
Materials Required:
Felt cloth- white, yellow and green
Buttons
Florist tape
Florist wire
Needle and thread

Steps
1. Flower Petals & center part
Cut out felt cloth in circle shape. The size can be of your choice. The smaller circles for center part need to be just 5mm diameter more than that of button.
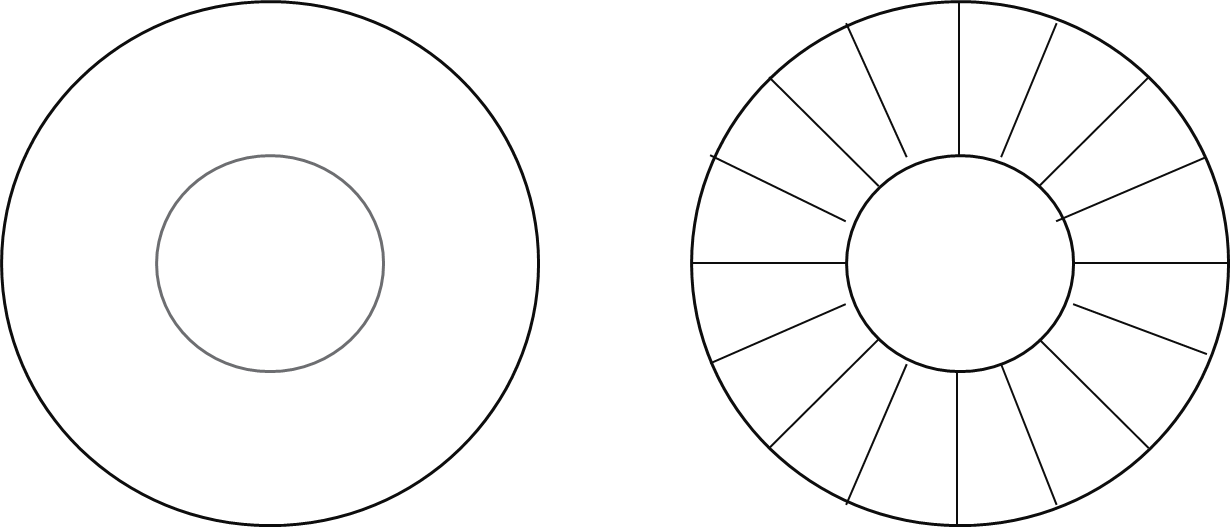

2. Creating Petals
Trace circular shapes on felt as given below. Start cutting across the lines.

Start cutting the edges first in one direction and then in opposite direction
3. Creating the middle part
Using button holes and the florist wire, create stem by passing the wires through the holes.
Twist the wires and make them tight
4. Using the earlier cut outs for center part, sew around the circle using running stitch.
5. Keep the created stem in center and pull the thread to secure it in middle. Stitch it as required and make sure its tight enough

6. Sepal is optional based on how pretty you want to make the flower look. Make a small hole on the center of petal to pass it through the stem.
Use the florist tape to cover the green wire.


Enjoy crafting.!!

May 13, 2014

Cherry Blossom..It's all about spring.!

Had been a year I created anything. So thought spring is the best time to be back with full of energy and liveliness.!!

Spring means its all about cherry blossom blooming and cherry blossom festivals at Washington D.C. and places like Macon, Georgia.
Lets make those cherry blossom flowers with felt material and bloom the living room with its beauty.

Materials required:
1. Felt cloth
2. wire- 20 gauge
3. wax coated strings
4. needle/ thread
5. beads (optional). Only if you do not find wax coated strings, then use beads to create the stigma

Step1. Cut the felt cloth in below shape. You can cut out the pattern in cardboard first to ease the job and have all with same size and shape.
Step2: Using needle and thread, start running stitch along the edge.

Step3: Start pulling the thread tight to create a flower shape.

Step4: Stitch the first and last petal together to make sure the pulled thread is tight and secured.
Step5: Start making 3 loops of wax coated string that will be used for making stigma. 
Step6: Use the metal wire, insert between the gaps and start twisting together.

Step7: Cut the top ends of these wires.
Step8: Add the created flower petals and adjust to make sure they are aligned closer and can be stitched tight.
Step9: Using needle and thread, stitch from bottom to top between the metal wires to secure the wire and felt cloth together.
Step10: Using a small dried branch, start fixing the flower by twisting the metal wires around the brand and you are all set.!!

Enjoy crafting..!! Hope you can share your experience making these flowers.!!! :)


December 29, 2012

Fabric Felt Roses

This time let's make easy fabric felt flowers to pin up on coats, jackets, knit tops, stoles and many more.!!
Let's learn how we can do this in no time..!!


Materials Required:
Fabric Felt- from 1 sheet you can make 2- 4 flowers, depending whether you want to make single roll flower or double. I am going to make double rolled with 2 different shades of fabrics.
Hot Glue gun
Scissors
Safety Pins

Making Steps:

This time all the steps are covered in the video link (click here)

Few Tips:
1. You can make flowers with single cut out sheet (which is quarter sheet of the full fabric sheet)
2. You can use same colors to make the flower bigger
3. Try to little glitter glue and let them dry to add more beauty to flowers, especially if its for kids.
4. I have demonstrated to you it with safety pins. You can glue it on hair pins, head bands too.!!!


Hope you enjoy this crafting..!!
Happy flower making..!! :)

Inspired from: Other blogs and youtube videos


August 20, 2012

Felt Roses in Wine bottle

The dining section really required a change as it was dull with few table mats. Also, as felting is now too interesting, I thought of making roses using felt. I was interested in contemporary look, so planned to go for blue and beige shade combo..!! 
So, lets get started...!


Required materials:

9 in * 12 in basic felts- for 24 roses I used 4 Aqua blue sheets and 1.5 Sandstone shades.( from Michaels)
Glue- Elmer's glue
Needle and thread
Florist Wire
Scotch Masking Tape #2050
Krylon Texture Paint 
Wine bottle
Wire cutter

My approximate cost: $12.00
Time consumed: approx 8 hr
Complexity: Medium

How to do:  

1. Making Roses- 
Roses are inspiration from a youtube video. I made these roses 2 years before using satin. So this time wished to fold it using felt.
Divide the 9*12 inch felt sheet into 1.5 inch strips. This gives you 6 strips of 1.5inch * 12 inch. I used 4 sheets to make 24 of these.

I created the below video to explain the making of roses.

http://www.youtube.com/watch?v=o5-mXJXK_Fc&feature=g-upl

2. Making sepals-
Use the Sandstone shade of felt for cutting out sepals for roses. 
Take a small sheet of paper and cut out 2 inch * 2 inch square.
Follow the below diagram for next steps.


As in diagram 1., fold the sheet into 4 both horizontally and vertically. Crease diagonally too.
Diagram 2. Cut out the shape and use this to cut out 24 pieces from felt sheet

Diagram 3. Fold each piece into half and give a small cut in the middle to make a grove.


3. Insert sepals to each rose through the groves. You can glue them to roses if there is a gap between them. Once all roses are ready its time to make the stem..!


4. Use the floral metal wire to create stem. I took 12 inch length and folded it thrice to give it strength. Then twist the wires together.


5. Insert it in the roses and tape it using either masking tape or colored duct tape.


6. Making a leaf-
I added a leaf to bring out beauty to the bouquet.!
- Fold the felt sheet and draw out half shape of the leaf. Cut the shape now.


- The leaf too needs floral wire so that it can be twisted the way you wish to keep it in the bottle
- Cut a wire of 10 inch and tape it at the center of leaf using masking

- Fold the leaf again into half, keeping the wire in the center.
- Use needle and thread and stitch around the wire and felt sheet. This gives a projected line at the center of leaf to give it a natural look.!! Isn't this pretty?! :)


- This is how it looks from backside.
- Twist the wire of the leaf around the bouquet and make it fall downward.

7. Wine bottle painting
- Spray paint the wine bottle using same shade as sepals. I used Krylon Texture paint with Stone texture.


8. Let them dry well for 4 hours. 
Note: Please read instructions on the can carefully before using.

9. You are ready to keep the roses in the bottle and decor the dining set..!!


10. Add little glitter at the center to make it more attractive.


Now its your turn to try it out.! Happy crafting..!! :D
Let me know your suggestions and comments.! :)

Suggestions:
- Roses can be made of satin ribbon of 1 inch or 1.5 inch width too.

Inspiration from:

http://www.youtube.com/watch?v=53sVo-K6peg&feature=related